The Only Devilled Eggs Recipe You’ll Ever Need
Yield: 24 egg halves
Prep Time: 20 minutes
Cook Time: 30 minutes
Total Time: 50 minutes
Devilled Eggs
Let me tell you about one of my favourite things to make: devilled eggs. There’s something about them that feels like home, nostalgia and a little bit of fancy all rolled into one. I’ve made thousands of these babies for restaurants, events, and my own kitchen over the years. It’s not just because they’re a crowd-pleaser (though they totally are)—it’s because of their perfect balance of simplicity, taste, and texture. Plus, they’re just plain fun to make.
But, confession time: I didn’t always love making hard-boiled eggs. Do you know why? The peeling. Nothing ruins your day faster than struggling to get stubborn shells off without turning your eggs into a dented mess. After learning about the steaming method, you’ll never boil your eggs again.
Why Steaming Wins Over Boiling Every Time
Here’s the deal: steaming eggs isn’t just easier—it’s smarter.
Easier Peeling: The heat from steam works magic on that pesky membrane under the shell, loosening it up so the shell practically slides off. No more egg-shaped craters or rage-quitting halfway through.
Even Cooking: Steam gently surrounds the eggs, cooking them evenly without bouncing them around like boiling water does. That means fewer cracks and no overcooked, rubbery whites.
Faster Process: Water boils faster in a steamer setup since you’re not filling a whole pot, and it’s easier to manage batches if you’re making a lot of eggs.
Science aside, it just makes life easier. And honestly, who doesn’t need a little less frustration in the kitchen?
A Devilled Egg Worth Showing Off
What makes a devilled egg unforgettable? It’s all about the little details:
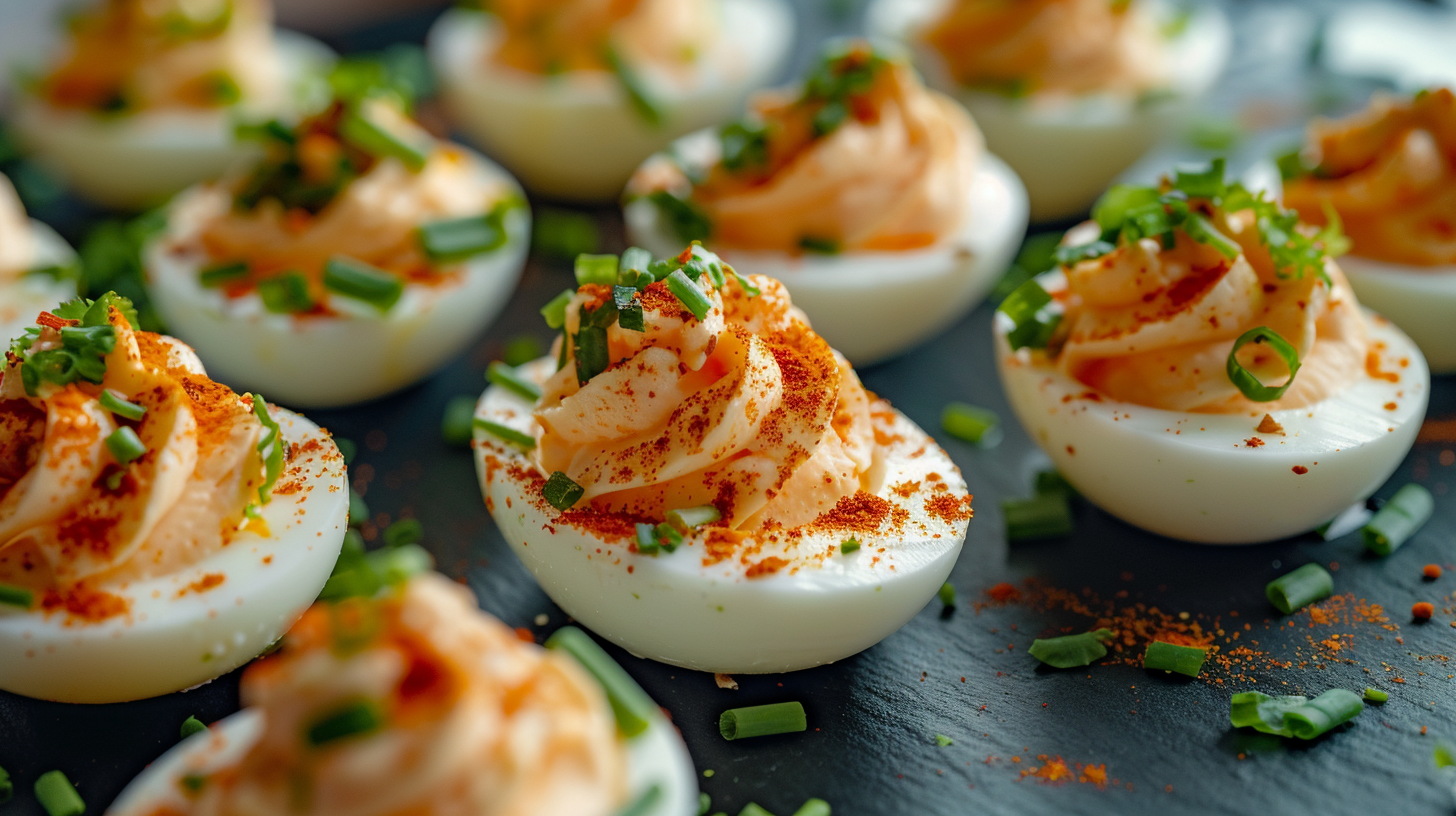
Fluffy Yolks: Pass those yolks through a tammy strainer or fine sieve. It’s an extra step, but the smoothness you’ll get in your filling is chef’s kiss.
The Right Mayo: I love using Kewpie mayo for its umami-packed richness, but if you’re feeling adventurous, whip up your own mayo with a hit of lemon zest. Trust me, it’s worth it.
That Smoky Finish: A light dusting of smoked paprika on top ties everything together. It adds colour, depth, and just a hint of smokiness that makes each bite pop.
The best part? Once you’ve nailed the basics, you can customize to your heart’s content. Bacon bits? Tempura flakes? A pinch of cayenne for heat? Go wild. Just don’t forget to eat one (or three) before serving—they disappear fast.
Why? Because Science
Why Steamed Eggs Are Easier to Peel than Boiled Eggs
Uniform and Gentle Heating:
Steaming cooks the egg using a consistent and gentle heat from the surrounding steam, as opposed to direct contact with boiling water. This reduces the likelihood of rapid temperature changes that can cause the membrane to bond tightly to the shell.
Membrane Detachment:
Inside an egg, there is a thin membrane just beneath the shell. Steaming creates a more gradual and uniform expansion of the egg's contents, which helps the membrane detach slightly from the shell. In boiling water, rapid heating can cause the membrane to stick more tightly, making peeling harder.
Higher Temperature Control:
Steam is hotter than boiling water (typically around 100°C or 212°F for water vs. slightly higher for steam), and this higher temperature allows the outer egg white to set more quickly. A well-set outer layer prevents the egg white from bonding as strongly with the inner membrane.
Ingredients:
12 large eggs
1 tsp salt
100 g Kewpie mayonnaise (or homemade mayonnaise) (⅓ cup)
1 tsp finely grated lemon zest
1 tbsp freshly squeezed lemon juice
½ tsp smoked paprika (for garnish)
Chopped chives (for garnish)
Optional Toppings:
Crispy bacon bits
Tempura bits
Additional smoked paprika for extra flavour
Tools Needed:
Tammy strainer or fine sieve
Piping bag with a star tip
Mixing bowls
bench scrapper
Method:
Steam the Eggs
Set up a steamer basket over a pot of water. Make sure the water level is low enough so it doesn’t touch the bottom of the basket.
Bring the water to a full boil, then reduce the heat to medium and maintain a simmer. This creates the perfect steaming environment for your eggs.
Place the eggs into the steamer basket in a single layer. Be careful not to overcrowd the basket so the eggs crowd together, as this allows even cooking.
Cover the pot with the lid and cook the eggs for exactly 13 minutes. Set a timer to ensure you don’t overcook them. Overcooking them will cuz the gray greenish ring around the yolk.
Once the time is up, use tongs or a slotted spoon to transfer the eggs into a large bowl of ice water. The cold water stops the cooking process immediately and makes the eggs easier to handle.
Peel the Eggs
Once the eggs are cool (after at least 10 minutes in the ice bath), gently tap them on the counter to create small cracks all over the shell.
The eggs will be significantly easier to peel thanks to the steaming method. Start by locating the loose bit of shell at one end of the egg, typically near the wider side where the air pocket forms. Pinch this loose area gently to reveal the thin membrane underneath the shell. Once you have hold of the membrane, peel it back slowly. The membrane acts as a natural barrier between the shell and the egg white, making it simple to remove the rest of the shell in larger pieces. This technique helps you avoid any frustration and ensures clean, smooth eggs ready for use.
If you encounter a stubborn shell, start peeling from the wider end where the air pocket usually forms—it’s often easier to begin here.
Prepare the Yolks
Slice each egg in half lengthwise using a sharp knife. Wipe the knife clean between cuts to ensure neat halves. Alternatively, you can gently roll the egg to cut the white and keep the yolk intact.
Use a teaspoon to carefully scoop the yolks into a mixing bowl. Be gentle to avoid tearing the delicate egg whites.
Push the yolks through a tammy strainer or fine sieve into the bowl using the bench scrapper. This process takes a little time but ensures the yolks are perfectly fluffy and lump-free. Work in small batches if necessary to avoid clogging the strainer.
Make the Filling
Add salt, Kewpie mayonnaise, lemon zest, and lemon juice to the bowl of yolks.
Using a spoon or rubber spatula, mix the ingredients together thoroughly. Aim for a smooth, creamy filling that holds its shape when piped. Taste the filling and adjust the seasoning if needed—you can add a touch more salt or lemon juice based on your preference.
Tip: If the mixture feels too thick, add a tiny splash of water or mayonnaise to loosen it slightly.
Fill the Eggs
Fill the piping bag fitted with a star tip. If you don’t have a piping bag, you can use a zip-top bag and snip off one corner for a makeshift option.
Pipe the filling into the hollow centre, creating a decorative swirl that sits just above the rim of the egg. This makes for a polished and professional presentation.
Garnish and Serve
Lightly dust the top of each deviled egg with smoked paprika and chopped chives. This adds both a pop of colour and a subtle smoky flavour that enhances the dish.
For additional flair, you can top the eggs with crispy bacon bits, crunchy tempura pieces, or an extra sprinkle of paprika for a bolder taste.
Eugene’s Extra Tips:
Storage: Devilled eggs are best eaten the same day but can be kept in an airtight container in the fridge for up to 24 hours.
Whole cooked hardboiled eggs can stay in the fridge up to a week submerged in cold water.
Customization: Feel free to experiment with the flavours—add a pinch of cayenne for heat or finely chopped fresh herbs like chives for a bright, fresh twist.
Avoid Overcooking: Overcooked yolks develop a green-grey ring around them and can taste sulfuric. Try not to cook them beyond 13 minutes.
How to Test Seasoning: Always taste your filling before piping it into the egg whites. Use a small spoon or your fingertip to sample. Adjust salt, lemon juice, or mayonnaise to your liking.
Plan for Extra Eggs: It’s normal to have a couple of eggs crack during steaming or to mess up when peeling. Steam a few extra eggs to ensure you have enough for your final presentation.
Arranging for Presentation: Place the finished eggs on a platter lined with lettuce leaves or a decorative tray to keep them from sliding around. This makes them look much nicer.
Experimenting with Garnishes: Start with a light sprinkle of paprika or bacon bits and assess the balance of flavours. Don’t overload the toppings as they can overpower the creamy filling.
Devilled Eggs Are a Reminder to Keep It Simple
In a world where everything feels like it has to be bigger, better, or more complicated, devilled eggs are a breath of fresh air. They remind me that sometimes the best things are the simplest—a few great ingredients, a little technique, and a lot of love.
If you give this recipe a try, let me know how it turns out! Drop a comment, send me a DM, or tag me on socials @TheEugeFood. Did you go classic, or did you experiment with some wild toppings? Either way, I want to see your creations. Let’s keep sharing these little joys of cooking together.
Happy cooking,
Eugene
You’ll Also Love These
Hi, I'm Eugene, but many of you might recognize me as "The_EugeFood". With over two decades working in diverse kitchens, I've come to cherish the genuine connections and shared experiences that cooking brings. For me, it's not about the high-pressure, competitive world you see on TV. It's about the joy of gathering around a table, the stories shared over simmering pots, and the laughter that follows a shared meal. I'm here to demystify the culinary world, to show you that if you can boil water for cup noodles, you're already on your way. Cooking isn't just a skill; it's a journey of discovery, and I invite you to join me on this adventure to becoming a better cook.


